|
Patient Demographics Screen |
  
|
|
Patient Demographics Screen |
|
The Patient Demographics screen is the primary location of all patient contact information, as well as insurance and billing details. The Demographic screen has four primary tabs and a lower button bar:
Basic Demographics
![]()
Last Name - required (apostrophe's are allowed; minimum 1 character)
First Name - required
Middle Initial - optional (can enter multiple characters)
NOTE: You can enter the name in all lowercase for speed; it will be converted automatically.
Title - the patient's salutation
Suffix - generational suffixes such as Jr, Sr, III
Date of Birth (DOB) - highly recommended. Can enter just 2-digit year, but day/month require 2-digits.
Address block - you can customize the city/state/zip list under Settings in the Main Module.
![]() NOTE: If you have entered the Guarantor/Subscriber for this patient already, you can use the blue arrow to pull the Guarantor's data forward
NOTE: If you have entered the Guarantor/Subscriber for this patient already, you can use the blue arrow to pull the Guarantor's data forward
Home Phone - primary telephone at home (Note that there is no cellphone field; use the Custom Fields)
Day Phone - typically the work phone number; can be used for cellphone also
Email - patient's email; will automatically check for correct formatting.
Employer - will display on the Insurance Claim form
Occupation -
Prior Exam - date of last encounter with patient

Gender - recommended. if not selected, you will be prompted on saving chart
Chart No. - created automatically and cannot be edited or changed.
Identification # - previously for Social Security number; can be used for any ID you wish.
Provider - the patients provider (in your office)

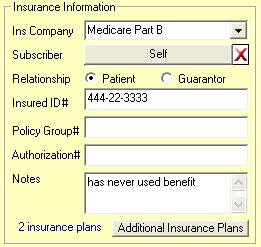
Insurance Company - select from list (you can add new companies in the Settings)
Insured Name - same as the Subscriber or Guarantor (e.g. who holds the policy)
Relationship - how is the Subscriber related to the patient (self or guarantor)
Insured ID - the insurance plan ID
Policy Group # - if the insurance plan has a group number, enter it here
Authorization # - if the insurance plan requires pre-approval and gives an authorization number
Notes - do not display on Claim Form; for your own internal use
Additional Insurance Plans - click the button to add or view additional plans (only for 2nd or additional)
HIPAA Notification status - allows you to indicate that patient has read/understood HIPAA requirements
Bad Address - if mail is returned and you wish to remove patient from mailing/recall lists
Inactive - if patient leaves the practice for some reason (charts will still be available for viewing)
![]()
More Information
![]()
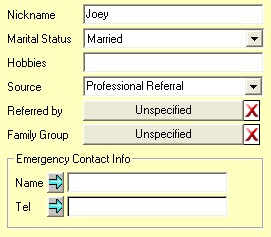
Nickname - an alternate preferred name by the patient
Marital Status - will display on the Insurance Claim form
Hobbies - useful to track patient activities to assist provider rapport
Source - what got the patient into your office
Referred by - who, if anyone, got the patient into your office
Family Group - if a patient is part of a family, you can indicate it here
Emergency Contact - a person to contact if a medical emergency occurs in office.
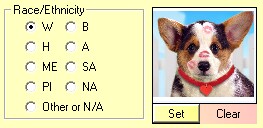
Race/Ethnicity - hold the mouse over the letters to see what abbreviations indicate.
Patient Picture - if you wish to have an image of the patient you need to: (1) take picture with a digital camera or camcorder, (2) save the image to a shared network folder or similar, and (3) click the Set button to find and display the image. Click Clear to reset to blank image. NOTE: Patient photos display in the Main Module when you click the patient name once.
Custom Fields - up to six custom fields can be created for inclusion in the patient demographics. Once you create a field name, it CANNOT be altered. This is to prevent data mixing (e.g. you create a field called 'email' then want to change it to 'cell phone', but the original data remains). If you wish to change a field you can only create a new one (and stop using the old one). Custom Fields can contain nearly any data. Examples can include: Cell Phone, Facebook ID, Nursing Home Facility, Prior Chart #, etc.
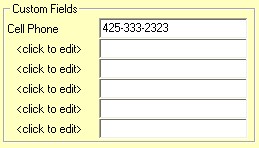
Chart Alerts - for important chart information that you wish to flag. The Alert icon will display at the top tab when you open the Patient Demographics, alerting you to the existence of a note. The Chart Alerts can be of any nature, but typically are special circumstances such as allergy notifications or collection accounts.

HIPAA Information
![]()
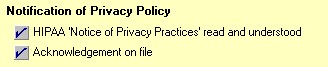
Notification of Privacy Policy - checking the HIPAA box on first Demographics screen auto checks these two boxes.
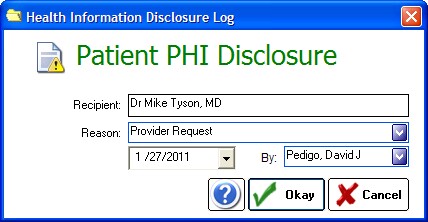
PHI Disclosures - Patient Health Information disclosures can be tracked on this screen.
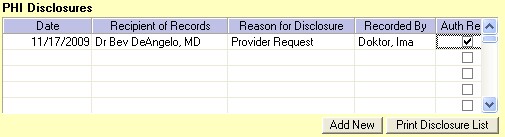
Each time the patient or an outside entity sends a record request, you should use the "Add New" button to record the event. You can print the Disclosure list when/if a patient requests to know who has requested PHI. Be sure to click Save on the Patient Demographics screen to finalize the data.
Privacy Requests - any specific privacy requests can be noted here

Acquisition Date - the original date the patient was entered into the database (or otherwise acquired by the practice.
Recall Date - the date the patient is scheduled for recall visit.
![]()
Patient Notes
![]()
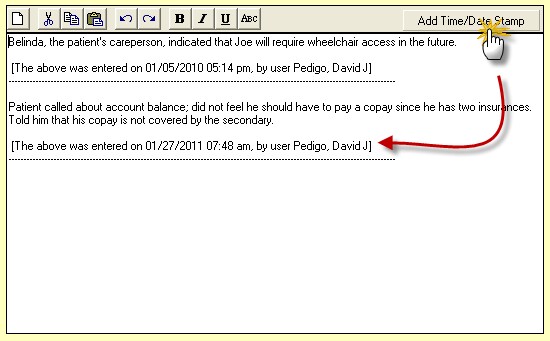
Free Text Notes - any sort of billing or personal notes can be entered in this section. It is NOT for clinical notes (it is not printed as part of the chart). The "Time/Date Stamp" will automatically add a separator after you enter the note with current date/time information.
Lower Button Bar

Customize Button - allows customization of lists/dropboxes (e.g. city, state, postal codes)
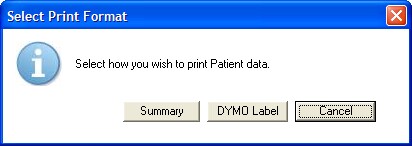
Print Button - prints either a Demographic Summary page or address label (on DYMO printer only)
Encounters Button - switches to Encounters view
Save Button - used after any changes are made to the demographic record. Also used to pull a chart when displayed in the Patient List into the Open Charts screen.
Balance Notice - if the patient has a balance due in ezClaimBiller, a red notification bar will display